Installing an inverter in your RV is one of the most rewarding upgrades you can make. It allows you to run AC appliances like microwaves, TVs, and laptops off your battery bank when you’re boondocking or dry camping. While the task may seem daunting, with the right preparation and guidance, a DIY installation is entirely achievable. This comprehensive guide will walk you through every step, from selecting the right inverter to testing your setup. Whether you’re a seasoned RVer or a first-time owner, you’ll find the tips and safety advice you need to power your adventures confidently.
Understanding RV Inverters
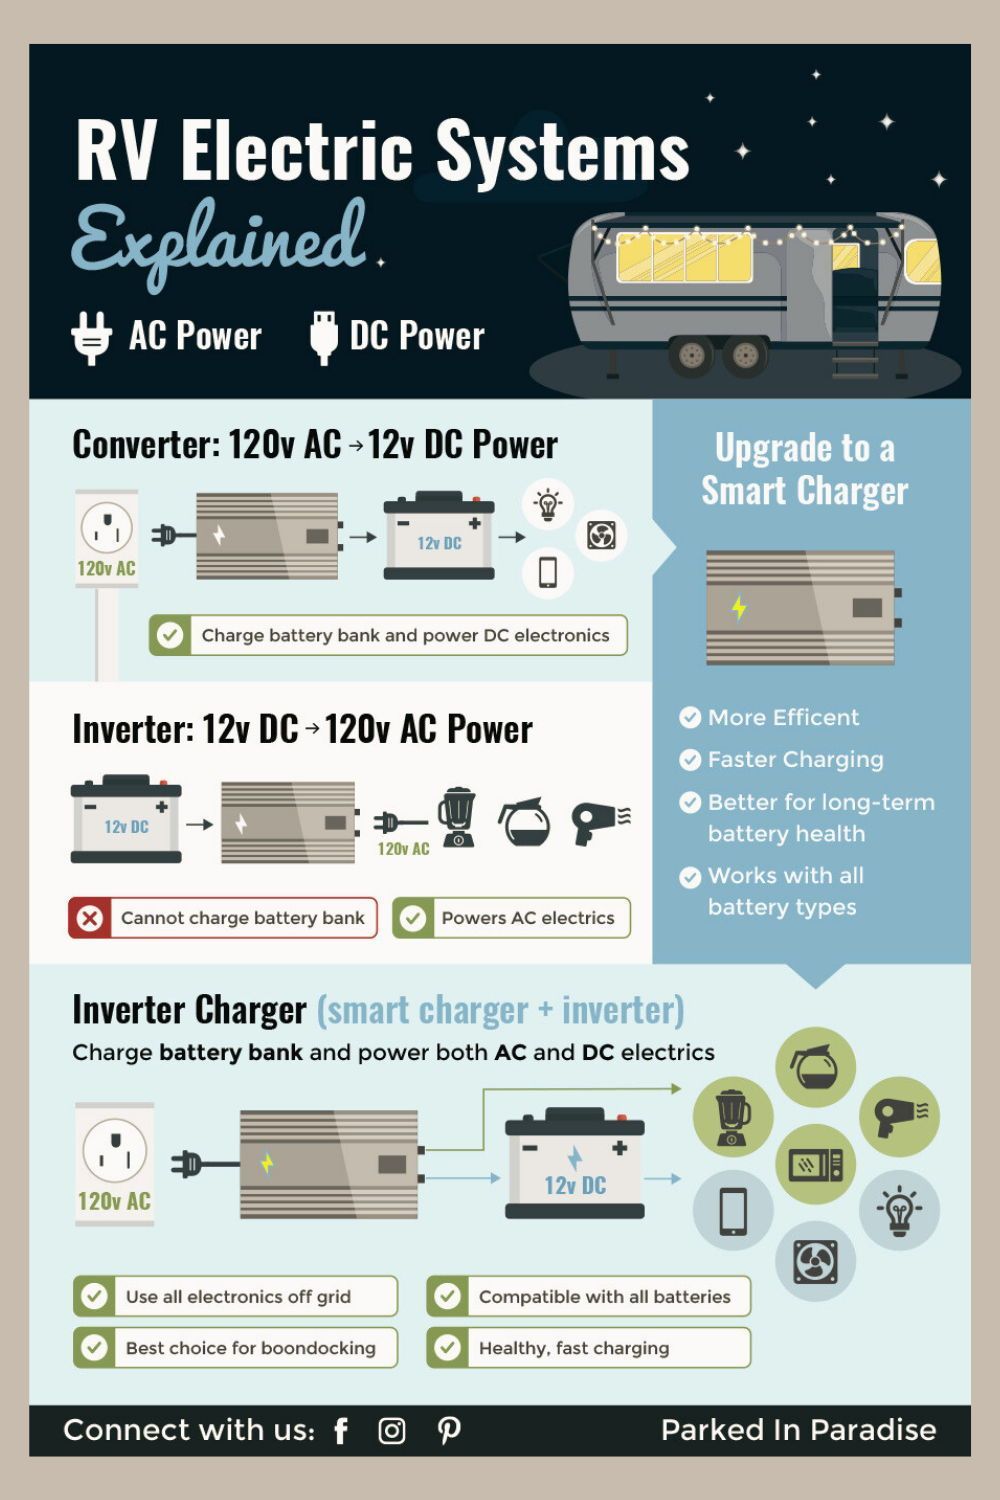
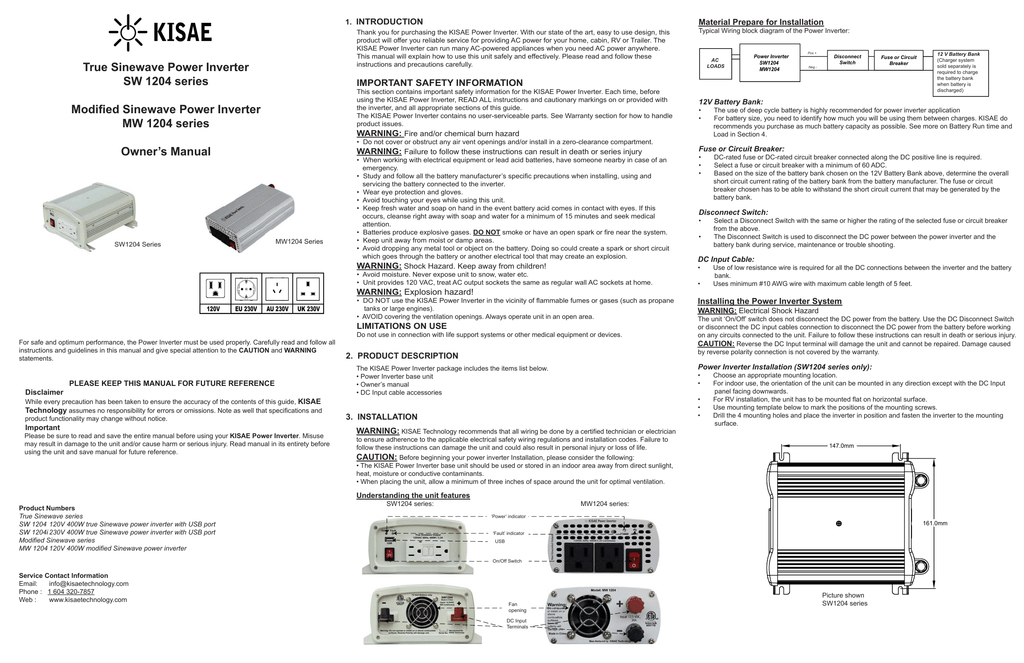
Before diving into installation, it’s crucial to understand what an inverter does and which type best suits your needs. An inverter converts DC (direct current) power from your RV’s batteries into AC (alternating current) power that standard household appliances use. Inverters come in two main types: modified sine wave and pure sine wave.
Modified sine wave inverters are cheaper but can cause issues with sensitive electronics like laptops, CPAP machines, or variable-speed tools. Pure sine wave inverters provide cleaner power, similar to household outlets, and are recommended for most RV applications. Additionally, consider the inverter’s continuous power rating (in watts). Add up the wattage of all devices you plan to run simultaneously and choose an inverter that exceeds that total. Common sizes for RVs range from 1000W to 3000W. Also, check the inverter’s peak or surge capacity, which handles startup loads of motors (e.g., refrigerators, air conditioners).
Tools and Materials Needed
Having the right tools and materials on hand will streamline your installation. Here’s what you’ll need:
- Inverter – Pure sine wave, appropriate wattage.
- Battery cables – 4/0 AWG or as specified by inverter manual (copper, stranded).
- Fuse or circuit breaker – Marine-rated, sized for your cable and inverter (e.g., 300A for a 3000W inverter).
- Battery terminals – Ring terminals, matching stud size.
- Tools: Wire strippers, crimpers, wrench set, screwdrivers, drill, multimeter.
- Safety gear: Insulated gloves, safety glasses.
- Additional: Cable lugs, heat shrink tubing, electrical tape, cable ties, conduit (if needed).
For hardwired inverters (connected to your RV’s AC panel), you’ll also need a transfer switch (or integrated unit) to prevent backfeeding and ensure safe operation. Always refer to your inverter’s manual for specific requirements.
Safety Precautions
Working with electricity, especially in the confined space of an RV, demands caution. Follow these safety guidelines to protect yourself and your equipment:
- Disconnect shore power and turn off all devices before starting.
- Disconnect the battery – Remove the negative terminal first, then the positive.
- Use proper fusing – A fuse or breaker must be installed within 18 inches (45 cm) of the battery on the positive cable.
- Insulate all connections – Use heat shrink or electrical tape to prevent shorts.
- Avoid loose connections – Tighten all terminals to manufacturer torque specs; loose connections cause overheating.
- Ventilate the area – Batteries can emit explosive gases; install inverter in a well-ventilated compartment.
- Use correct wire gauge – Undersized wires create voltage drop and fire risk. Consult a wire size chart.
If you’re unsure about any step, consult a professional electrician. Safety is paramount.
Step-by-Step Installation
Now let’s go through the installation process. This assumes you’re mounting the inverter near the battery bank (within 10–15 feet) and using a separate AC outlet or hardwiring to your panel.
Step 1: Choose the Mounting Location
Pick a dry, well-ventilated spot close to the batteries. Common locations include a compartment near the battery, under a bed, or in a storage bay. Ensure the inverter is mounted horizontally and has clearance for cooling fans. Use vibration-dampening material if needed.
Step 2: Mount the Inverter
Secure the inverter using screws into a solid surface. Follow the orientation guidelines in the manual (typically fans should not be obstructed). Leave enough room to access the terminals and switches.
Step 3: Run DC Cables
Measure and cut the positive and negative cables. Route the cable from the battery to the inverter, avoiding sharp edges and hot components. Use grommets when passing through walls. Keep the cables as short as possible to minimize voltage drop.
Step 4: Connect the Fuse
Install the fuse holder on the positive cable within 18 inches of the battery terminal. Do not install the fuse yet. This prevents accidental shorts.
Step 5: Connect to Battery
Attach ring terminals to the cable ends. Connect the negative cable to the battery negative terminal first. Then connect the positive cable to the battery positive terminal. Do not connect the positive end at the inverter yet.
Step 6: Connect to Inverter
Attach the positive and negative cables to the inverter’s DC input terminals. Ensure correct polarity (red to +, black to -). Tighten securely. Insert the fuse into the holder and close the cover.
Step 7: Grounding
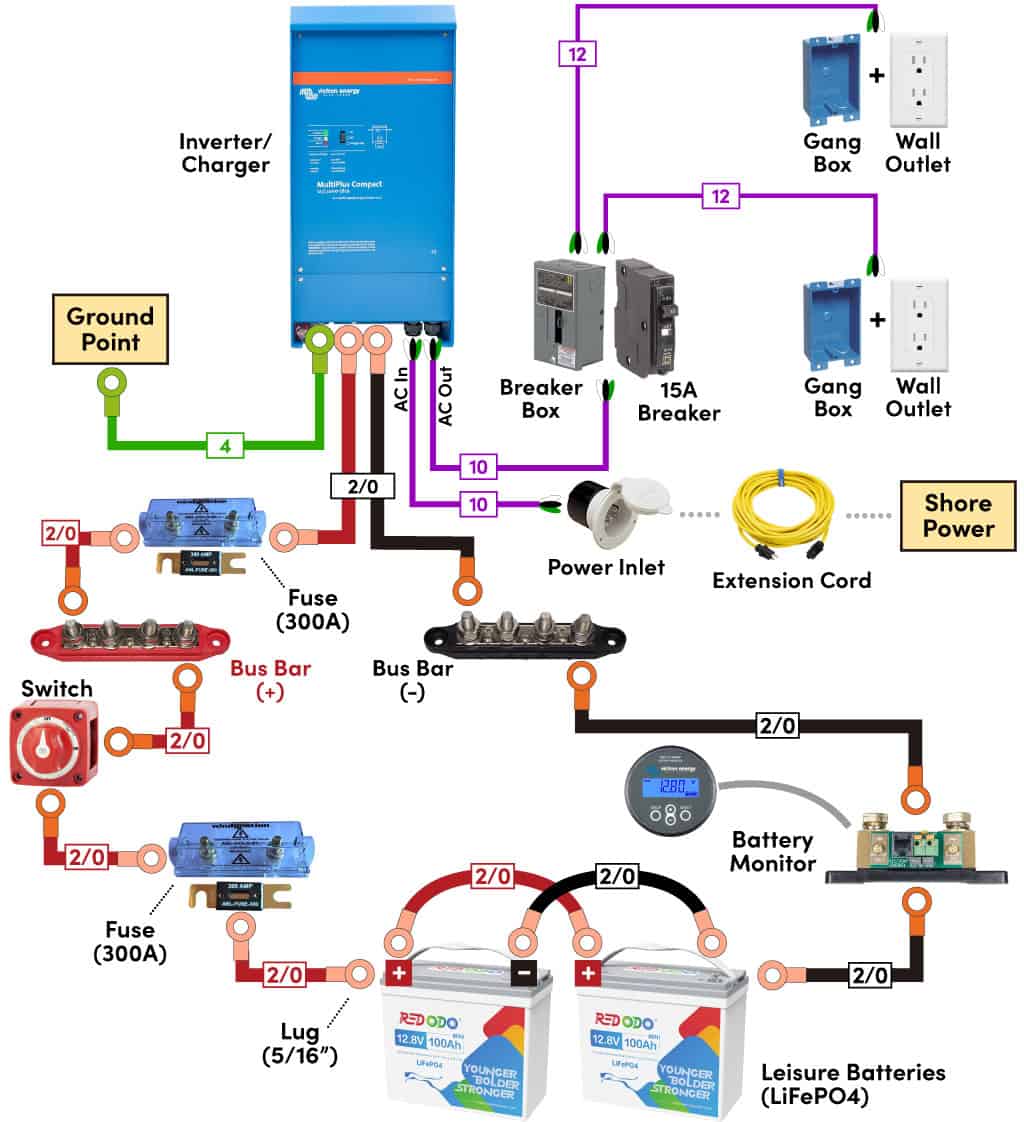
Ground the inverter chassis to the RV’s ground (usually the chassis or a grounding bus). Use a separate green wire. Some inverters have a grounding terminal; refer to the manual.
Wiring the Inverter to Battery and AC Panel
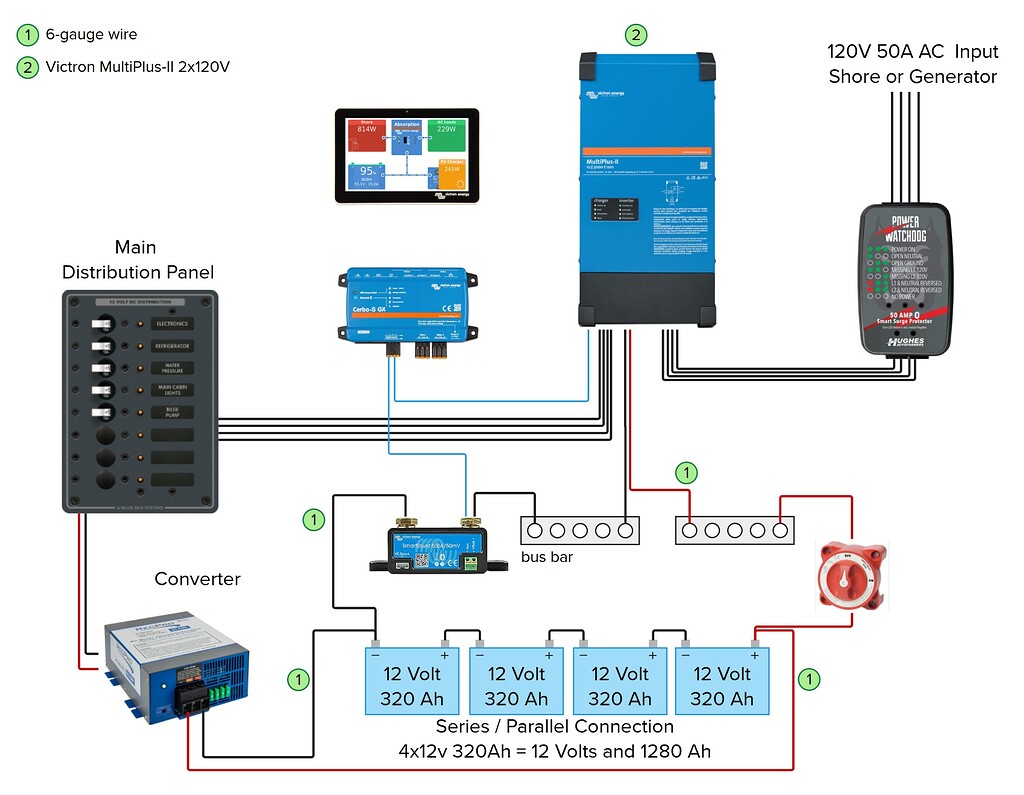
If you want the inverter to power your RV’s existing AC outlets, you’ll need to connect it to the AC distribution panel via a transfer switch. The transfer switch automatically selects between shore power and inverter power, preventing backfeeding.
For a simple setup, install a dedicated outlet wired directly from the inverter. This is easier but limits which devices you can use. For a whole-RV solution, follow these steps:
- Run AC output from the inverter to the transfer switch input.
- Connect the transfer switch output to the AC panel (or a specific breaker).
- Ensure the transfer switch is rated for your inverter’s output and your RV’s system.
- Follow the transfer switch’s wiring diagram carefully.
Remember, the inverter’s neutral and ground must be bonded only at one point (usually inside the inverter or at the main panel) to avoid ground loops. Many inverters have a bonding screw that should be used when not connected to shore power. Refer to local codes and your manual.
Testing and Troubleshooting
After installation, verify your work with systematic testing:
- Check voltages – Use a multimeter to confirm battery voltage at the inverter terminals (12V or 24V).
- Turn on inverter – Press the power button. Listen for the internal fan and indicator light. It should show normal operation.
- Test with a small load – Plug in a lamp or phone charger. If it works, try a larger load like a microwave.
- Check for errors – If the inverter beeps or shuts off, likely causes are low battery, overload, or high temperature. Consult the manual’s fault codes.
- Inspect connections – After running under load for a few minutes, feel for warm cables or terminals. Overheating indicates loose connections or undersized wires.
Common troubleshooting tips: Ensure battery is fully charged and has sufficient capacity (deep-cycle batteries recommended). Check that all connections are tight. Verify that the inverter’s remote switch (if any) is properly connected.
Frequently Asked Questions
Can I install an RV inverter myself?
Yes, many RV owners successfully install inverters themselves. However, if you’re uncomfortable with electrical work, hire a professional. Safety first.
What size inverter do I need?
Calculate the total wattage of devices you plan to run simultaneously. Add 20% margin. For typical RV use, 1500W to 3000W is common.
Do I need a pure sine wave inverter?
For sensitive electronics, yes. Modified sine wave may cause humming or damage in some devices. Pure sine wave is recommended.
How do I ground an RV inverter?
Connect the inverter’s grounding terminal to the RV chassis or a common ground point using a heavy gauge wire (e.g., 8 AWG). This prevents electric shock.
Can I run my RV air conditioner off an inverter?
Only if you have a large battery bank and a high-wattage inverter (3000W+) plus a soft start for the AC. It’s possible but drains batteries quickly.
What batteries are best for an inverter?
Deep-cycle lithium batteries (LiFePO4) are best due to long life and high discharge rates. AGM batteries are a cheaper alternative.
How long can I run my inverter before draining the battery?
Depends on battery capacity and load. For example, a 100Ah battery powering a 100W load lasts about 1 hour (at 50% depth of discharge). Use a battery monitor.
By now, you should have a solid understanding of how to install an RV inverter safely and effectively. This upgrade will give you the freedom to enjoy modern comforts wherever you park. Always double-check connections, follow your equipment manuals, and don’t hesitate to ask for help if needed. Happy camping!